| Parent |
| WARNING: | The 'Step 1 - Low-level formatting' procedure below works for the IBM Fixed Disk Adapter, the hard drive controller supplied in the IBM 5160 (XT). It won't necessarily work for other types of XT-class controllers. |
| Step 1.1 | Boot from a DOS boot disk that contains DEBUG.COM |
| Step 1.2 | Execute DEBUG. DEBUG will present a dash ("-") prompt. When you see that prompt, enter the following commands (shown in brown): |
| - a 100 | |
| xxxx:0100 mov ax,0705 | (Comment: [07] = function 07h of INT 13h, [05] = use an interleave of 5 ) |
| xxxx:0103 mov cx,0001 | (Comment: Start at {cylinder 0, sector 1}. Cylinder number contained in CH and upper two bits of CL. Sector number in lower 6 bits of CL. ) |
| xxxx:0106 mov dx,0080 | (Comment: [00] = head 0, [80] = hard drive 0 ) |
| xxxx:0109 int 13 | (Comment: INT 13h) |
| xxxx:010B int 3 | (Comment: Breakpoint return for DEBUG) |
| xxxx:010C <------------------------ | at this line just press the [ENTER] key - this will return DEBUG's dash prompt |
| - g=100 | (Comment: Executes the code that we typed in above) |
| Note: | Low-level formatting will start. You will see the hard drive's access light turn on, and stay on for the duration of the format. Low-level formatting should take a few minutes for 10MB and 20MB sized MFM drives. |
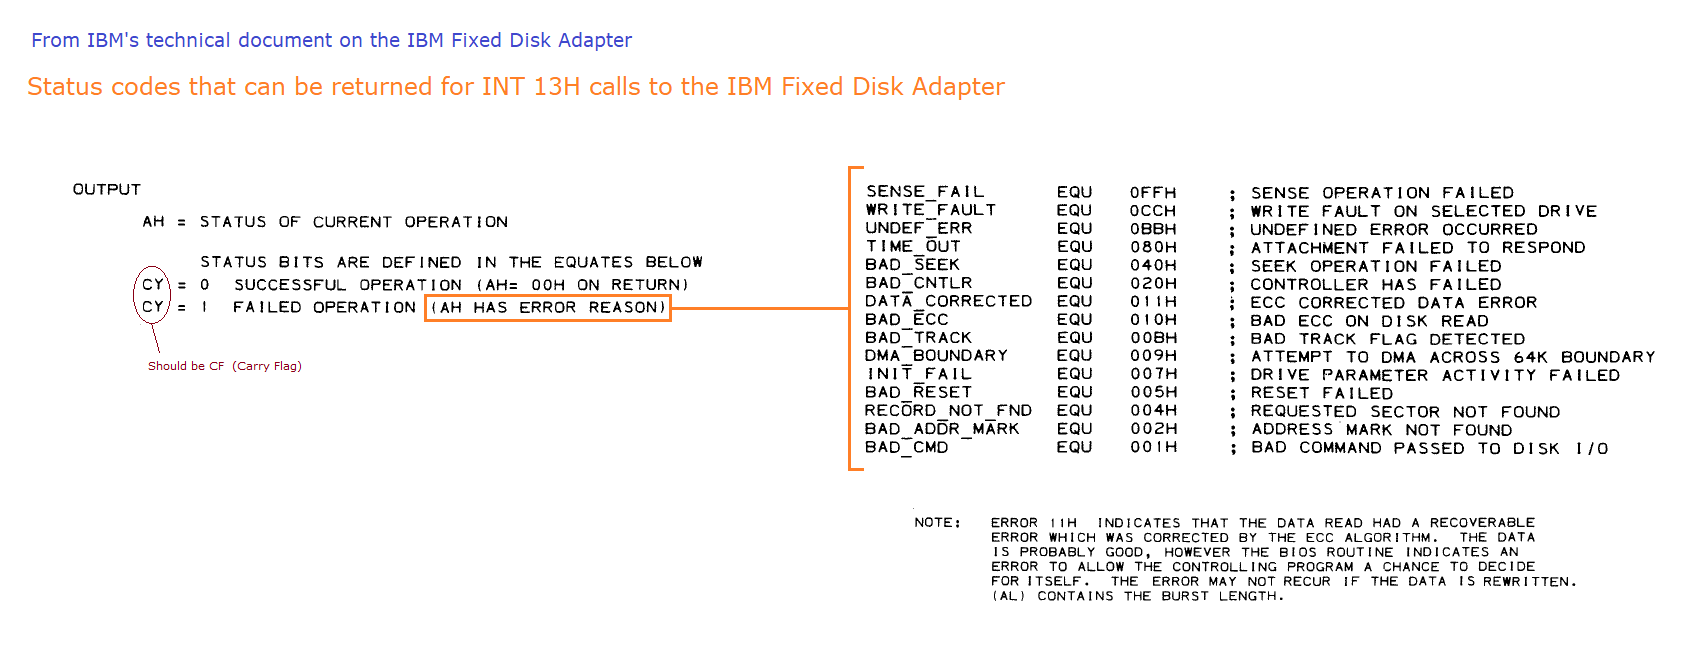
| Step 1.3 | When low-level formatting finishes, DEBUG will display the CPU registers and CPU flags, then return the dash prompt. Of the CPU registers, verify that register AH is 00 (zero) per the diagram at here. Register AH being zero indicates success. A non-zero value indicates that an error was encountered - see here. |
| Step 2.1 | Boot from a DOS boot disk that contains DEBUG.COM |
| Step 2.2 | Execute DEBUG. DEBUG will present a dash ("-") prompt. When you see that prompt, enter the following commands (shown in brown): |
| - f cs:1000 1200 00 | (Comment: Sets 512 bytes starting at offset 1000h to zero) |
| - a 100 | |
| xxxx:0100 mov ah,00 | (Comment: [00] = function 00h of INT 13h ) |
| xxxx:0102 mov dl,80 | (Comment: [80] = hard drive 0 ) |
| xxxx:0104 int 13 | (Comment: INT 13h) |
| xxxx:0106 mov ax,0301 | (Comment: [03] = function 03h of INT 13h, [01] = one sector to write ) |
| xxxx:0109 mov bx,1000 | (Comment: Point ES:BX to our local data buffer, at offset 1000h ) |
| xxxx:010C mov cx,0001 | (Comment: Cylinder 0, sector 1. Cylinder number contained in CH and upper two bits of CL. Sector number in lower 6 bits of CL ) |
| xxxx:010F mov dx,0080 | (Comment: [00] = head 0, [80] = hard drive 0 ) |
| xxxx:0112 int 13 | (Comment: INT 13h) |
| xxxx:0114 int 3 | (Comment: Breakpoint return for DEBUG) |
| xxxx:0115 <------------------------ | at this line just press the [ENTER] key - this will return DEBUG's dash prompt |
| - g=100 | (Comment: Executes the code that we typed in above) |
| Step 2.3 | Shortly after the "g=100" line is entered, DEBUG will display the CPU registers and CPU flags, then return the dash prompt. Exit from DEBUG by entering a Q at DEBUG's dash prompt. |
| Step 2.4 | Should you wish to verify that the first sector (the MBR) is 'wiped', see here. |
| Note 1 | Instead of doing it the way as shown above, what is expected to work is the use of function 0Fh of INT13 as step 1, then as step 2, do the low-level formatting bit. |