| 1. |
Boot from a DOS boot disk that contains DEBUG.COM |
| |
|
| 2. |
Execute DEBUG. DEBUG will present a dash ("-") prompt. |
| |
|
| 3. |
When you see the dash prompt, enter the following commands (shown in brown):
| - a 80 |
|
| xxxx:0080 mov ah,02 |
(Comment: [02] = function 02h of INT 13h ) |
| xxxx:0082 mov dl,80 |
(Comment: [80] = hard drive 0 ) |
| xxxx:0084 mov dh,00 |
(Comment: [00] = head 0 ) |
| xxxx:0086 mov cx,0001 |
(Comment: Start at {cylinder 0, sector 1}. Cylinder number contained in CH and upper two bits of CL. Sector number in lower 6 bits of CL. ) |
| xxxx:0089 mov al,01 |
(Comment: [01] = 1 sector is to be read ) |
| xxxx:008B mov bx,0100 |
(Comment: Point ES:BX to our local data buffer, at offset 0100h ) |
| xxxx:008E int 13 |
(Comment: INT 13h) |
| xxxx:0090 int 3 |
(Comment: Breakpoint return for DEBUG) |
| xxxx:0091 <------------------------ |
at this line just press the [ENTER] key - this will return DEBUG's dash prompt |
| - g=80 |
(Comment: Executes the code that we typed in above) |
|
| |
|
| 4. |
Shortly after you type in the G=80, the code will finish executing, then DEBUG will list the registers and flags of the CPU. As shown at here, verify that the AH register contains 00 (AL is unimportant) and that you see "NC". Those two present is the BIOS indicating that the 'read sector' operation was successful. |
| 1. |
Boot from a DOS boot disk that contains the 'Disk Editor' tool of Norton Utilities 6. The tool will be named either DISKEDIT.EXE or DE.EXE |
| |
|
| 2. |
Execute Disk Editor. |
| |
|
| 3. |
If a window appears indicating that Disk Editor is in read-only mode, press the [ENTER] key to acknowlege the message. (Read-only is okay - we will not be doing any writing.) |
| |
|
| |
We are going to inform Disk Editor that we want to view drives as 'physical'. 'Physical', because viewing a hard drive via 'logical' will view only the DOS partition on the hard drive. |
| |
|
| 4. |
On the menu bar, select [Object] then [Drive]. A window will appear. ALT-D on the keyboard is another way of showing the window. |
| |
|
| 5. |
Change the 'Type' to 'Physical disks' by pressing [TAB] then [SPACEBAR]. |
| |
|
| 6. |
In the left half of the window, you will see a list of physical drives. If your computer contains two hard drives, the list will include 'Hard Disk 2'. If the current selection is not your target, then press the [TAB] key three times, then use the UP and DOWN arrow keys to select the desired target. |
| |
|
| 7. |
Press the [ENTER] key. That will close the window, and by default, you will be shown the MBR (cylinder 0, head 0, sector 1) on the chosen hard drive. |
| |
|
| 8. |
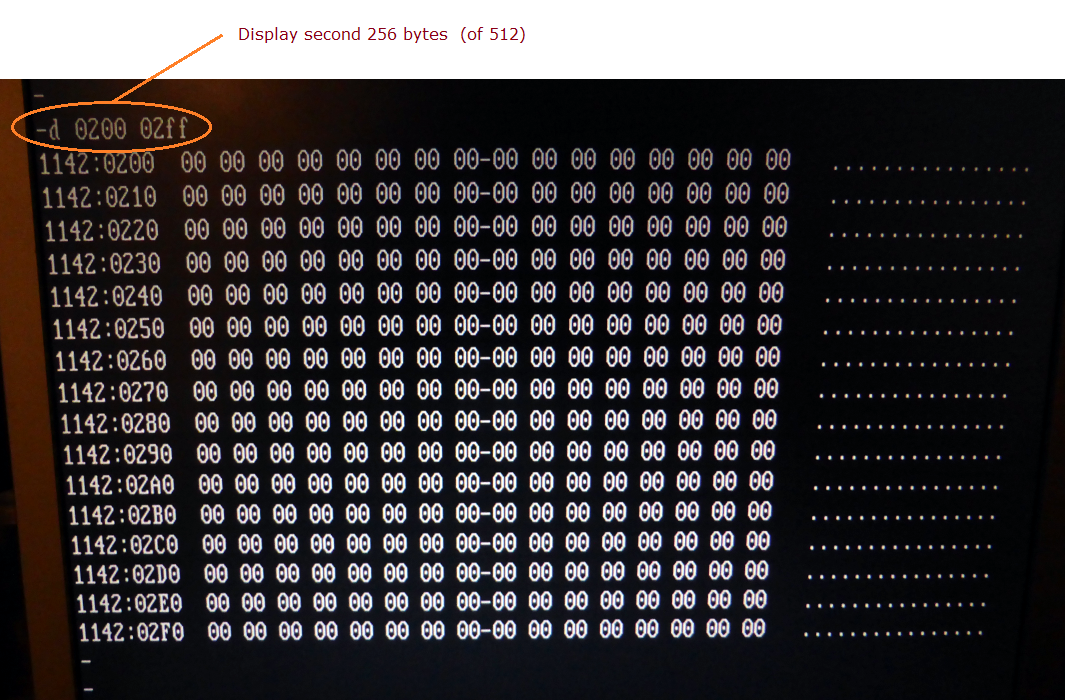
Verify that all 512 bytes are 00. |
| 1. |
Install HxD software on your modern computer (obviously, if not already installed). |
| |
|
| 2. |
Attach the CF to your computer via a suitable card reader. |
| |
|
| 3. |
On the Windows desktop, right-click on the HxD icon, then of the presented options, click on 'Run as administrator'. |
| |
|
| 4. |
When the User Account Control window appears, click on [Yes]. |
| |
|
| 5. |
On the menu bar, click on [Tools] then [Open disk]. ( On early versions of HxD, [Extras] then [Open disk] ) |
| |
|
| 6. |
Double-click on the drive that corresponds to the CF. Guidance on this is shown at here. |
| |
|
| |
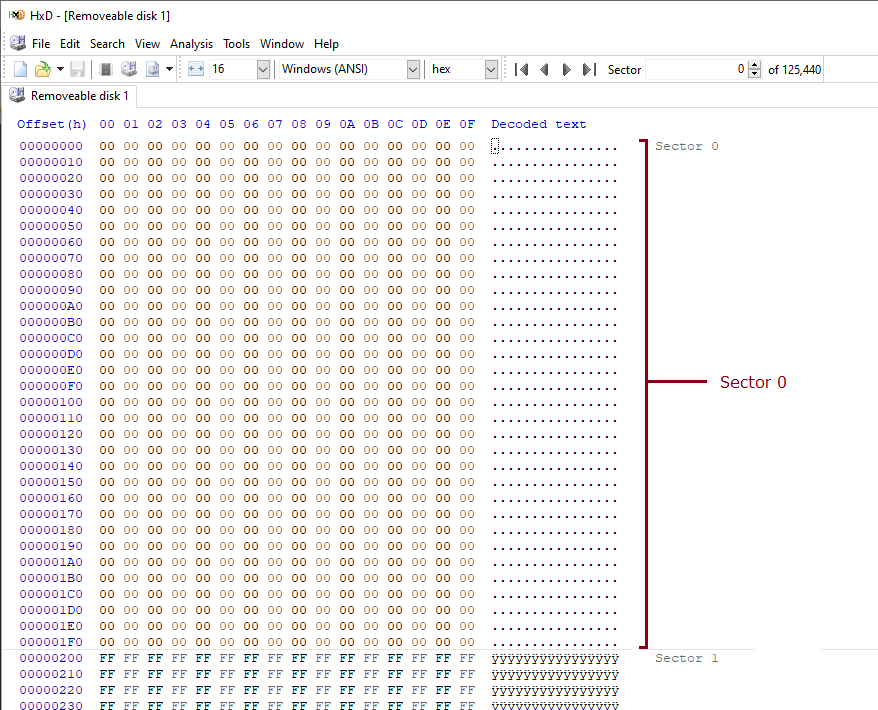
Sector 0 and part of sector 1 is displayed, and the insertion point is at the first byte.
The MBR is sector 0 (512 bytes at offset 0 through 1FF). |
| |
|
| 7. |
Verify that all bytes in the displayed 'sector 0' are zero (00), as shown at here. |
| |
|
| 8. |
Exit HxD. |